Letting the Internet Draw on my LED Display

LEDraw started with a fun idea: letting random people on the internet draw on the little LED display next to my desk.
It began with a small LED matrix display that sat on my desk, showing a few stats, the weather, and a tiny clock. When it stopped working and I went looking for a replacement, I stumbled across these cheap LED strips on AliExpress and started wondering: how hard would it be to rebuild this myself as a more playful version?
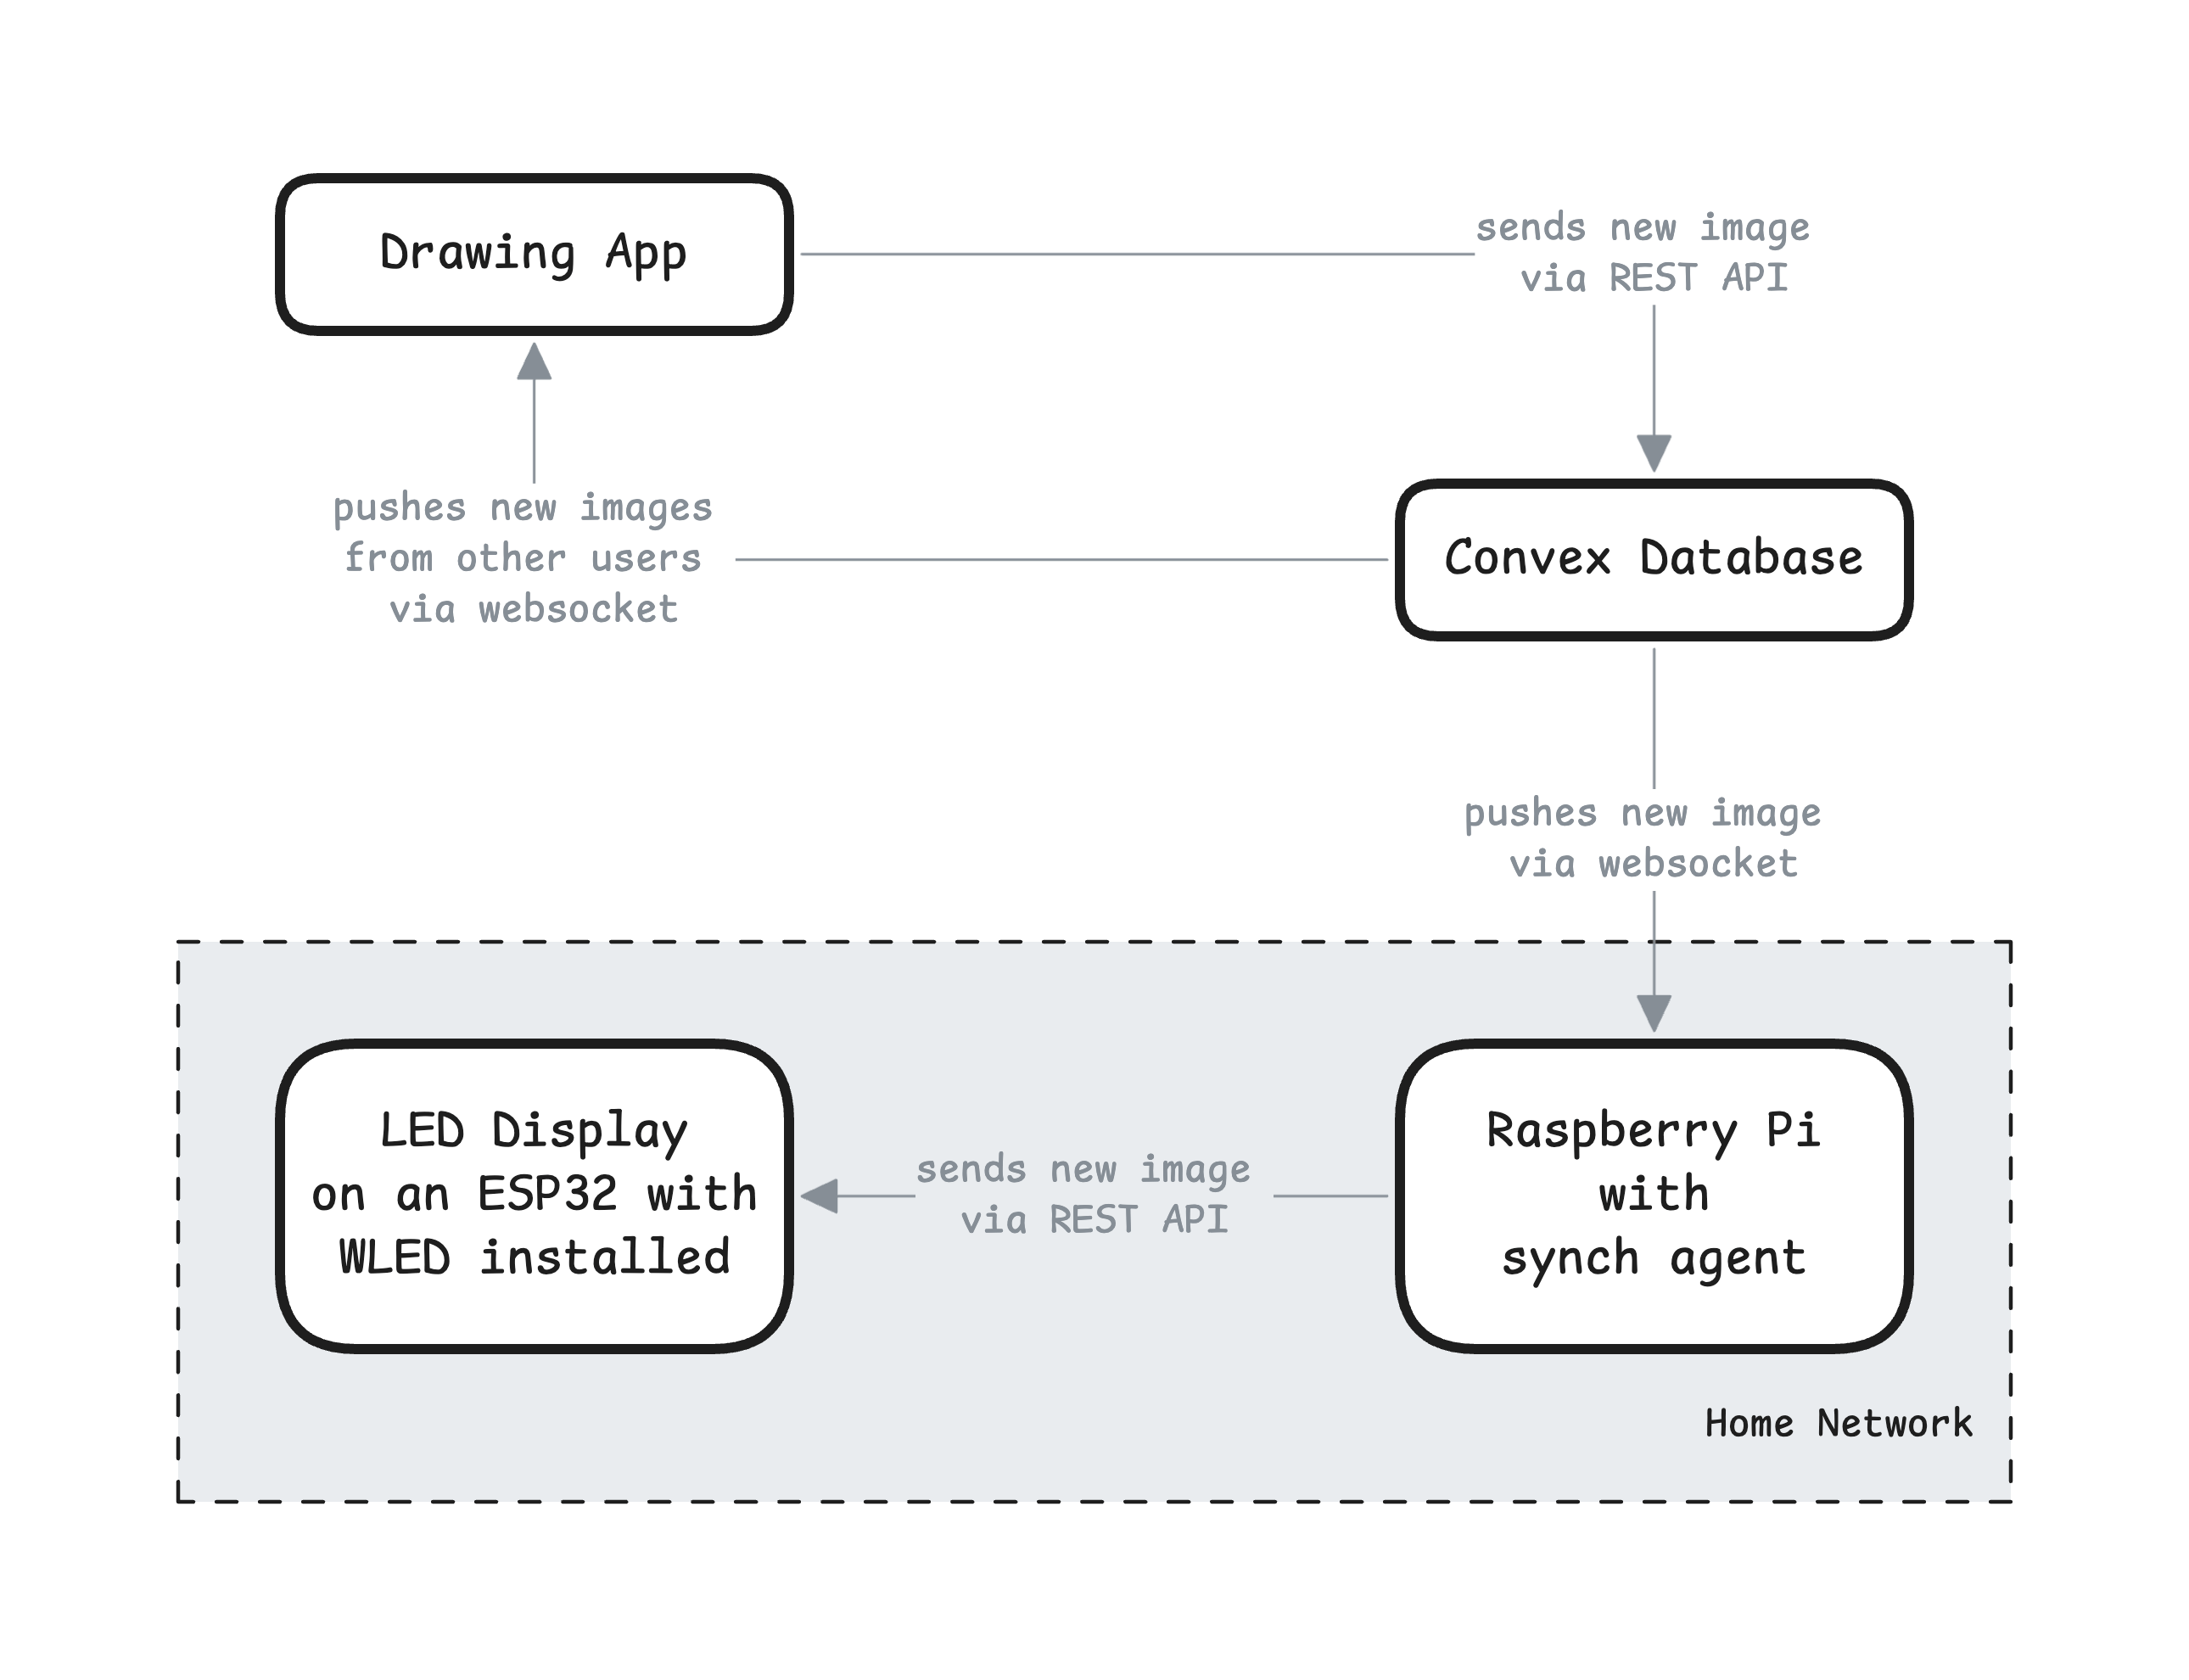
The General Setup
Before going into detail, here's a high-level overview of the final components and how they work together:
Building the LED Panel
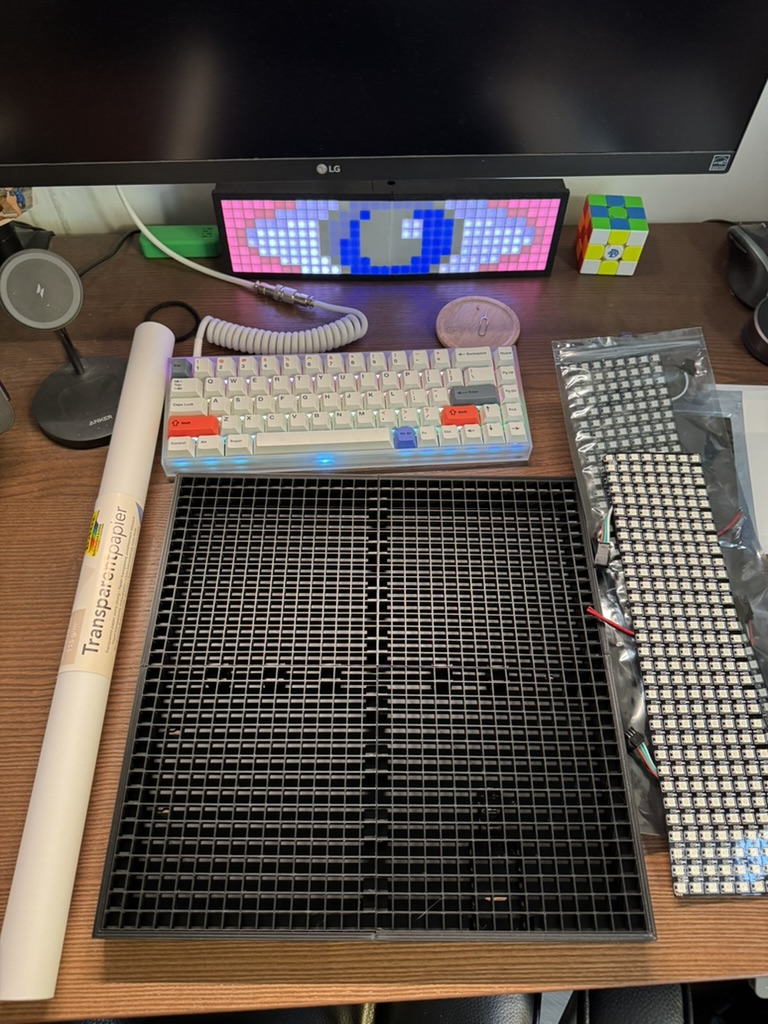
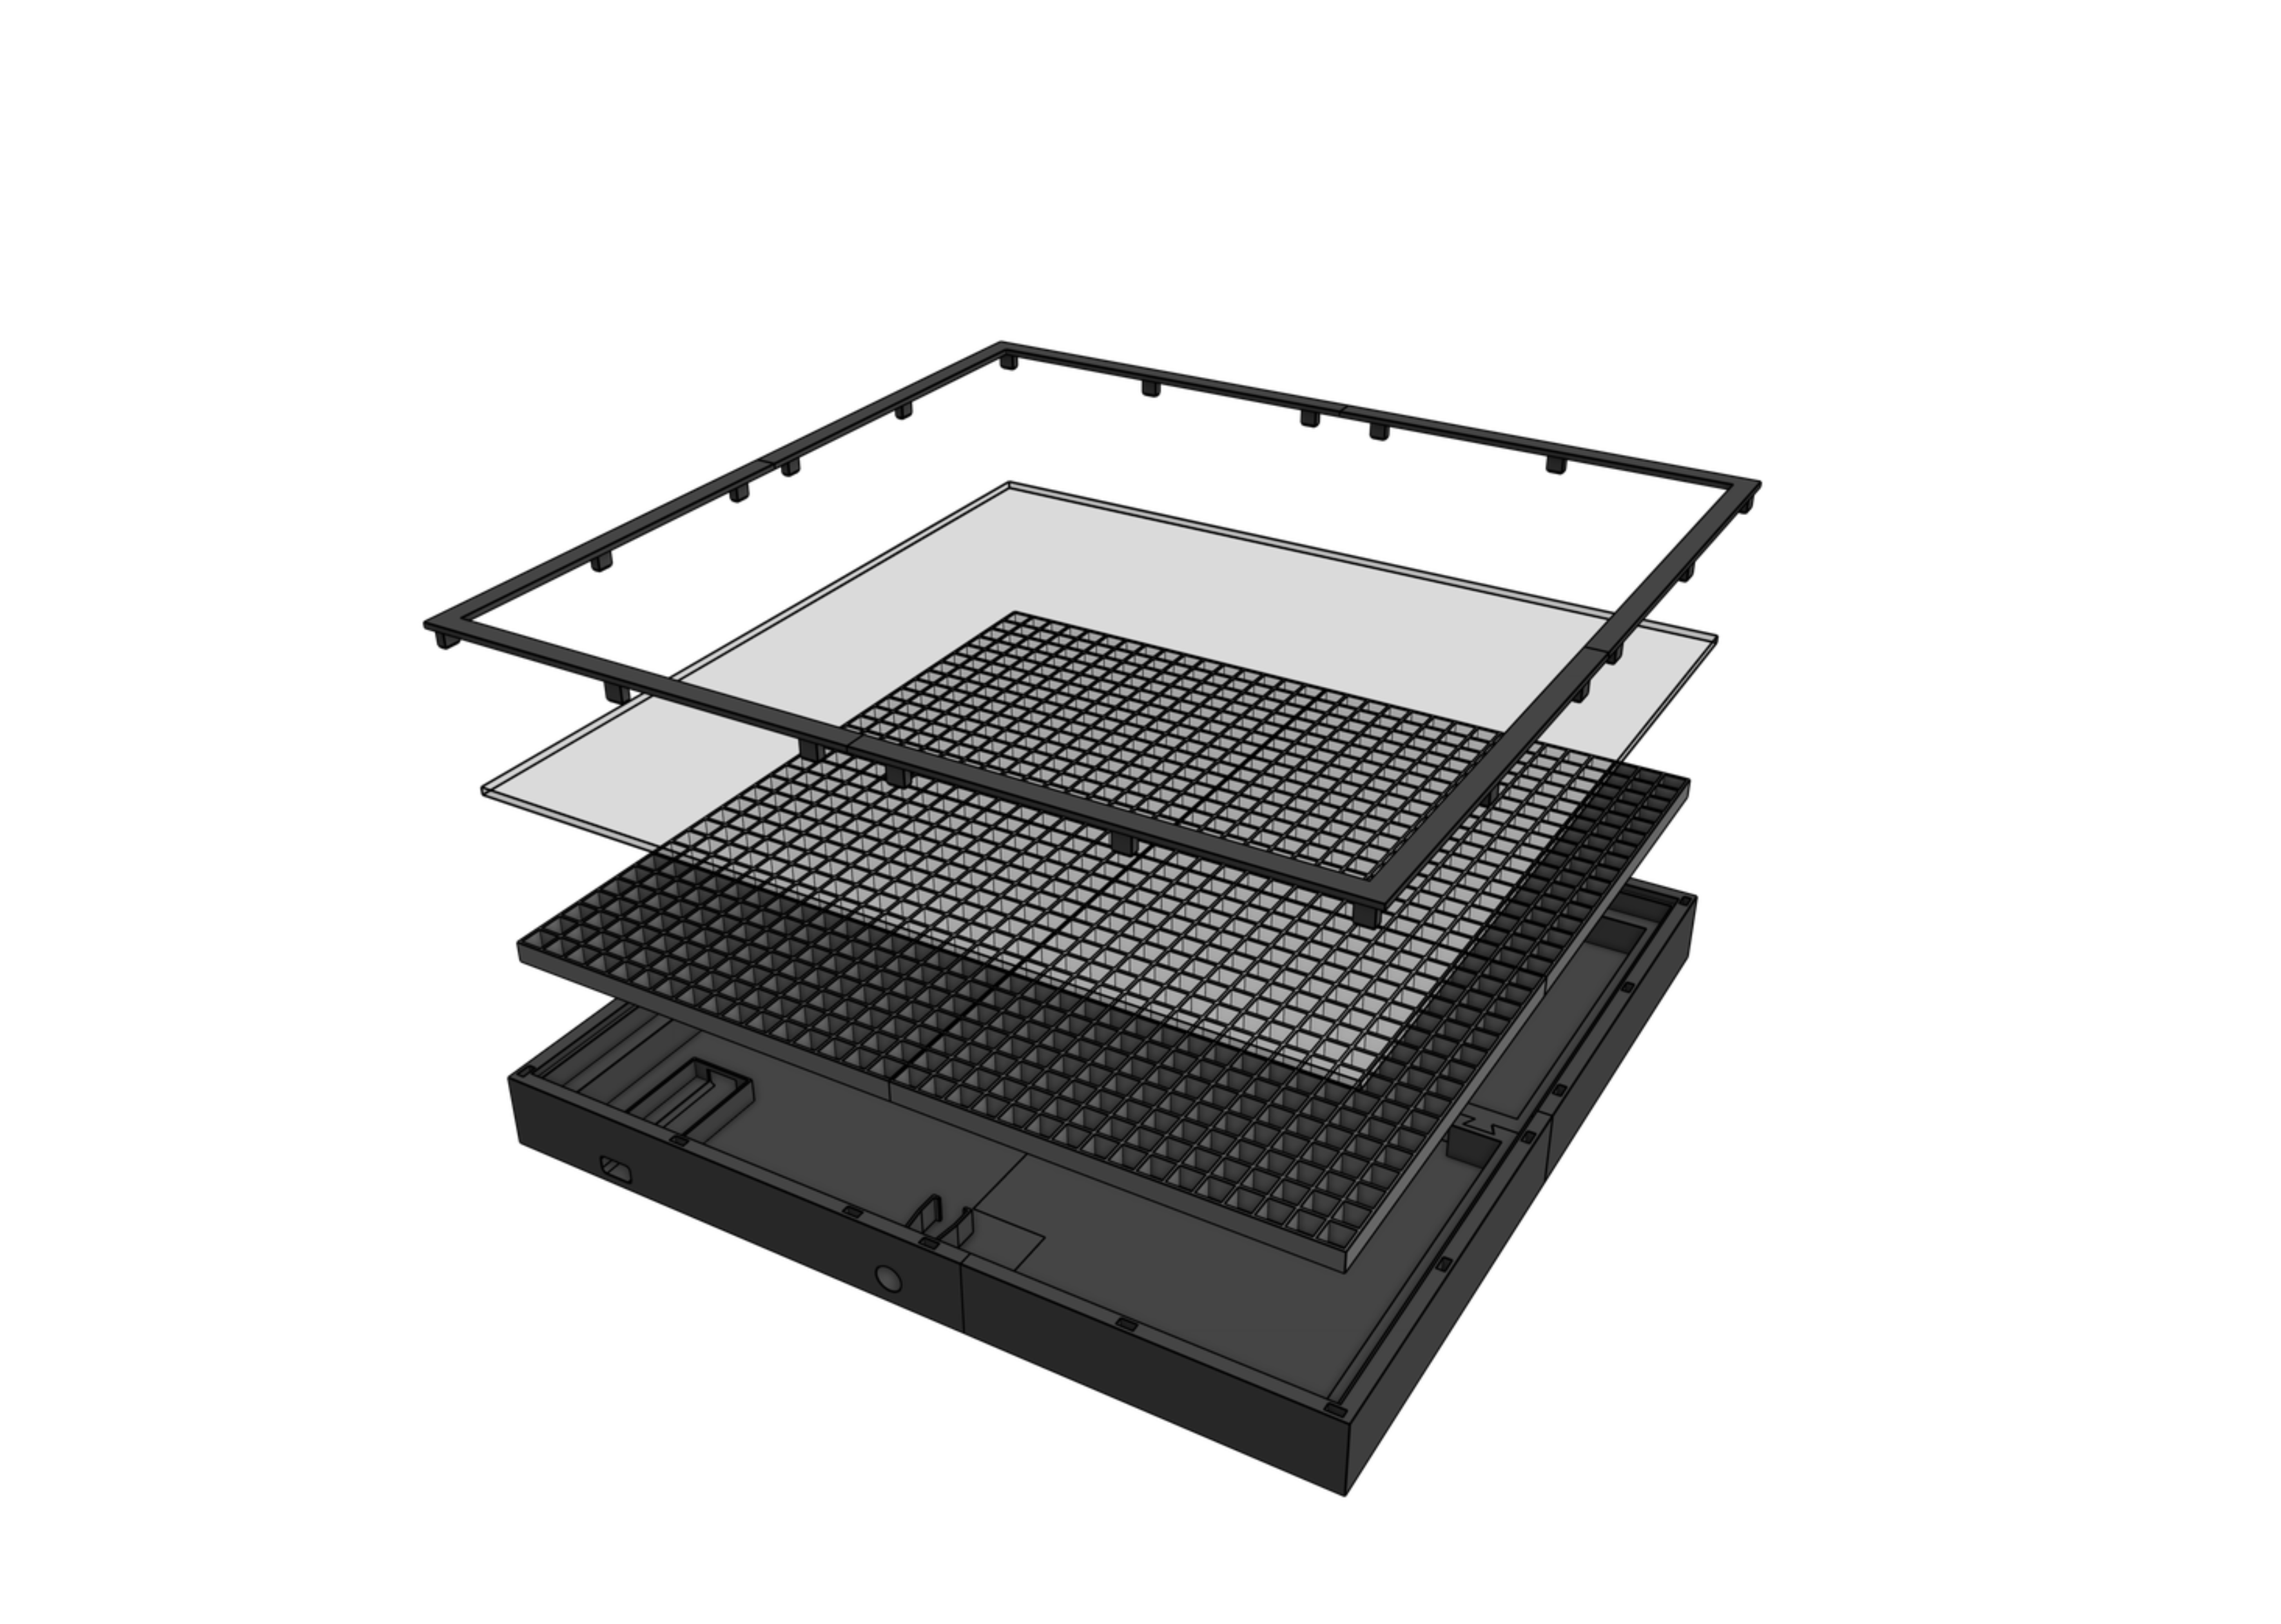
I had just bought myself a new 3D printer and needed a good excuse to use it, so the display had to live in a printed case. At first I was ready to design and print my own housing, then I came across a 3D model on MakerWorld that was almost exactly what I had in mind and ended up using it as the case for the display.
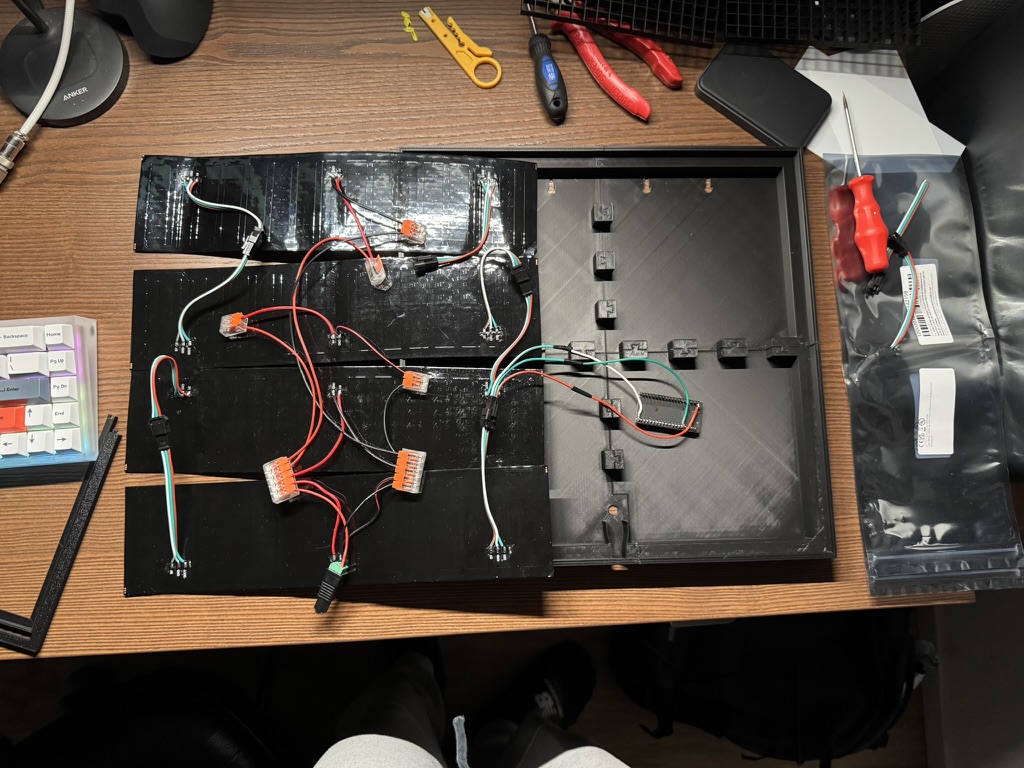
The hardware side stayed pleasantly simple. I already had an ESP32 lying around, and WLED seems to be the de facto standard for driving addressable LEDs, so using them together felt like the natural choice. Conveniently, the MakerWorld model even included a short guide for this exact setup, with wiring diagrams and suggested WLED settings. Most of the effort went into fiddling with the physical look, especially the diffusion. The diffusion is the white cover in front of the LEDs, which softens the light so you don’t see every single LED as a harsh point. I first tried 3D-printed diffusers, but the display was large enough that I had to print the cover in four pieces, and the seams were clearly visible. In the end I switched to a sheet of translucent art paper from a stationery store. It’s not perfect, since the paper doesn’t lie completely flat on the frame, but it gives the display a soft, even glow without losing too much detail.
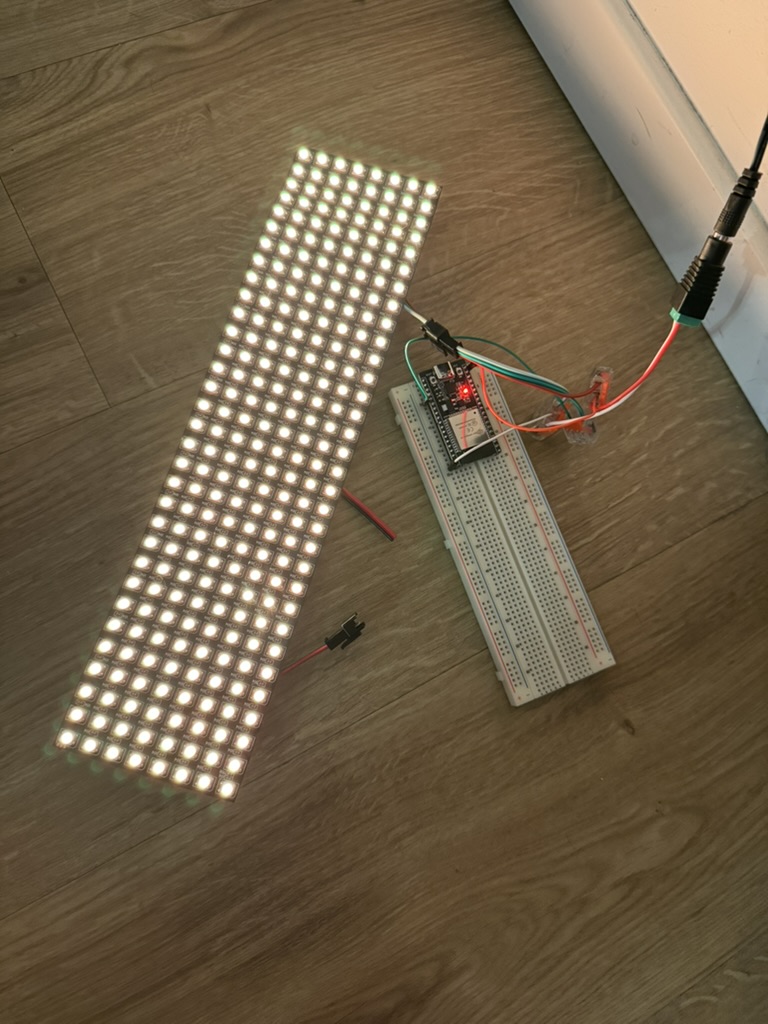

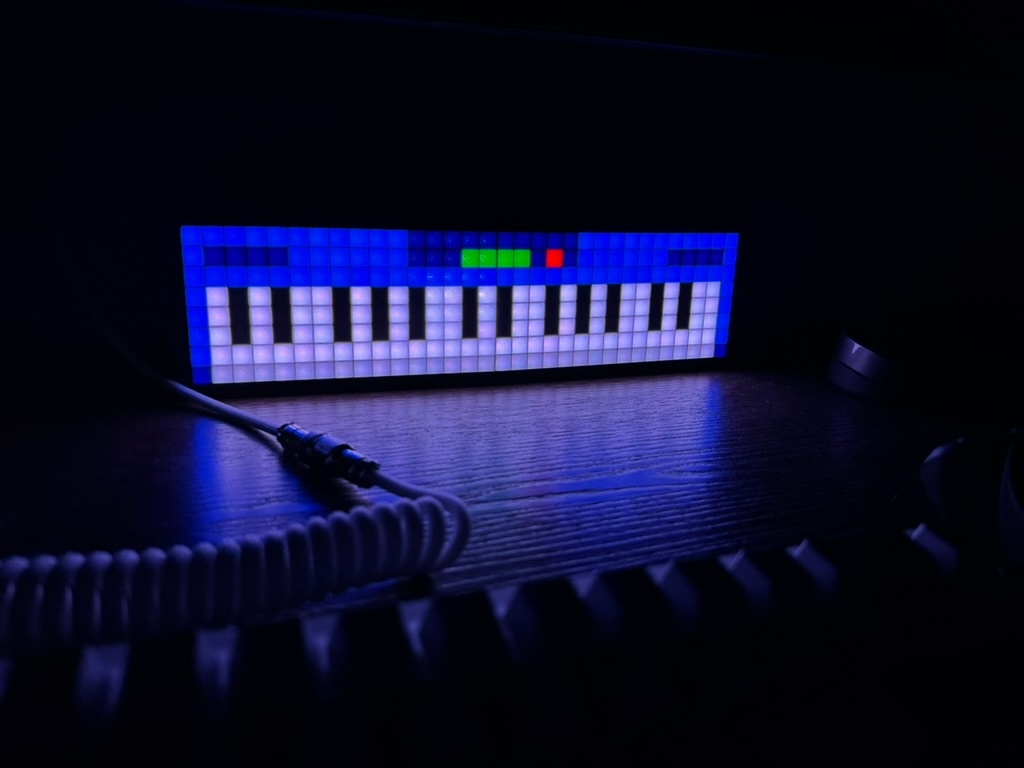
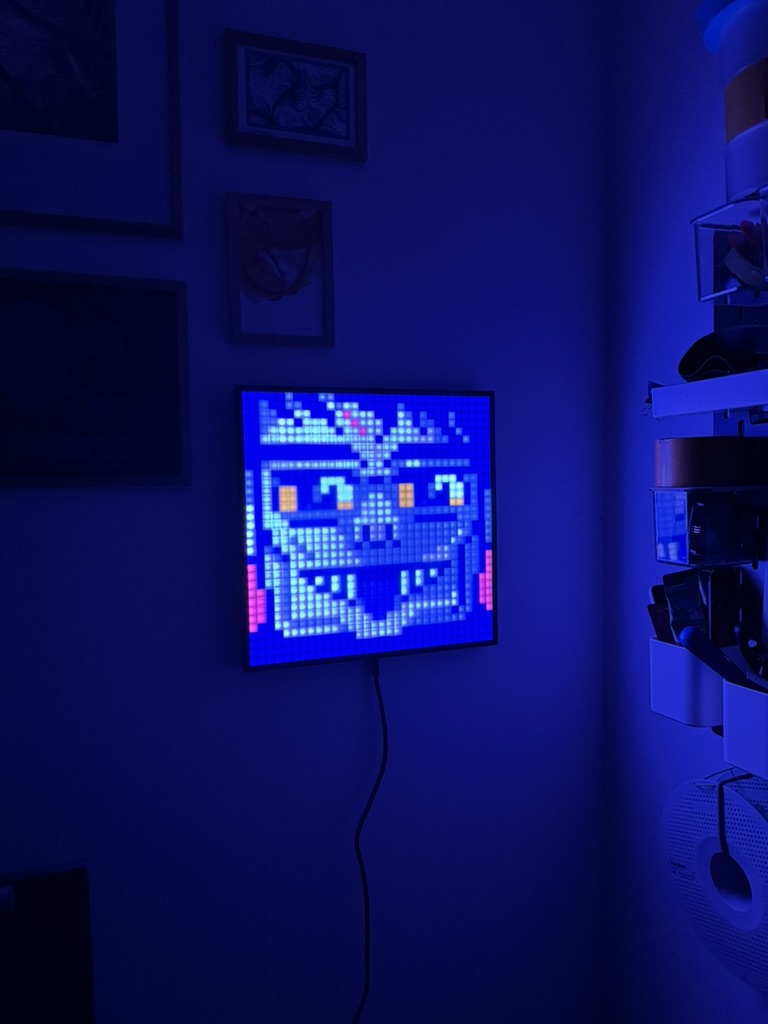
I started with a 32x8 layout because it matched the proportions of my old display, but as the drawing app grew more capable, that resolution quickly ran out of room. Switching to a 32x32 display made a huge difference, because most of the new features only really made sense when the drawings can be a bit more complex.
Building the Drawing App
Once the hardware was sorted out, I was back in my comfort zone. Building web apps is my day job, so I was fairly sure I could make a solid drawing app. For this kind of project I would usually reach for Next.js, but this time I wanted to try TanStack Start, which I had been following for a while now. It builds on TanStack Router, which has become a favourite of mine as it is a router that offers real end-to-end type safety and all by inference.
For the backend I tried Convex for the first time because I have heard so many great things about it. Convex is a backend platform that lets you write your server logic and data layer entirely in TypeScript. One thing that really stood out to me was that every backend code change was instantly deployed to the development environment, including their hosted dashboard where you can immediately see the updated data and functions. It "just works" unless you introduce breaking changes. In those cases, Convex forces you to add a migration strategy. This workflow gave me a lot of confidence, because the development environment is very close to the production one. I will definitely use it again.
The first version of the app was extremely simple. There was a single canvas with one shared state for everyone. My first idea was that everyone would draw on it at the same time and whatever happened there would be mirrored directly onto the LED display. That was also the initial reason I wanted to use Convex. They offer a very nice interface to read from the database and subscribe to future updates of the same query. On paper that sounded charming, a shared board that keeps changing as people add their drawings. In practice, however, it would be awful. People could constantly overwrite each other's work, and they could lose an almost finished drawing in a few seconds if someone else decided to paint over it. And even if I had chosen that mechanic, it only would have been fun if there had been a steady stream of people drawing together all the time, which is not realistic for a small side project.
So I changed the behaviour to something much simpler. Now everyone draws locally in the browser first. When you are happy with your drawing, you can publish it to the server. That made much more sense to me, but it still had a potential problem. What if someone saves a drawing and someone else overwrites it shortly after? In the rare case that the site gets a bit of traffic, people would draw a lot of images and only the last one that was saved would get attention. That would be a waste of people's time and effort.
The solution is a very simple queue. Every published drawing gets at least twelve hours on the display. Any new drawings that arrive while one is already showing are added to the queue and wait their turn. The twelve-hour window is mostly a gut feeling. I don’t expect a constant stream of traffic, so twelve hours should be enough to build up a nice backlog whenever there is a small bump in visitors. If there is ever a really busy day, that single burst of activity could keep the display busy for days or even weeks.
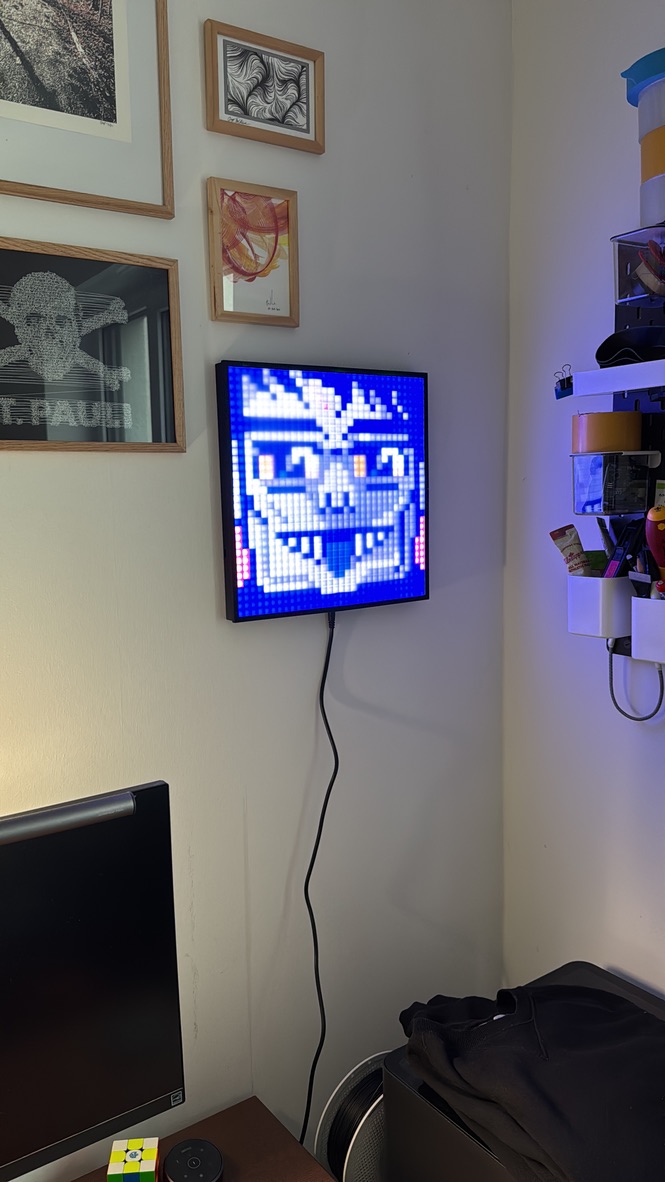
After the queue was in place I sent the app to my dear friend Christian and asked him to try it. He is a very good pixel artist and it was so much fun to see a new drawing every other day. It was that pleasant feeling that you get when everything comes together and just works the way you planned it.
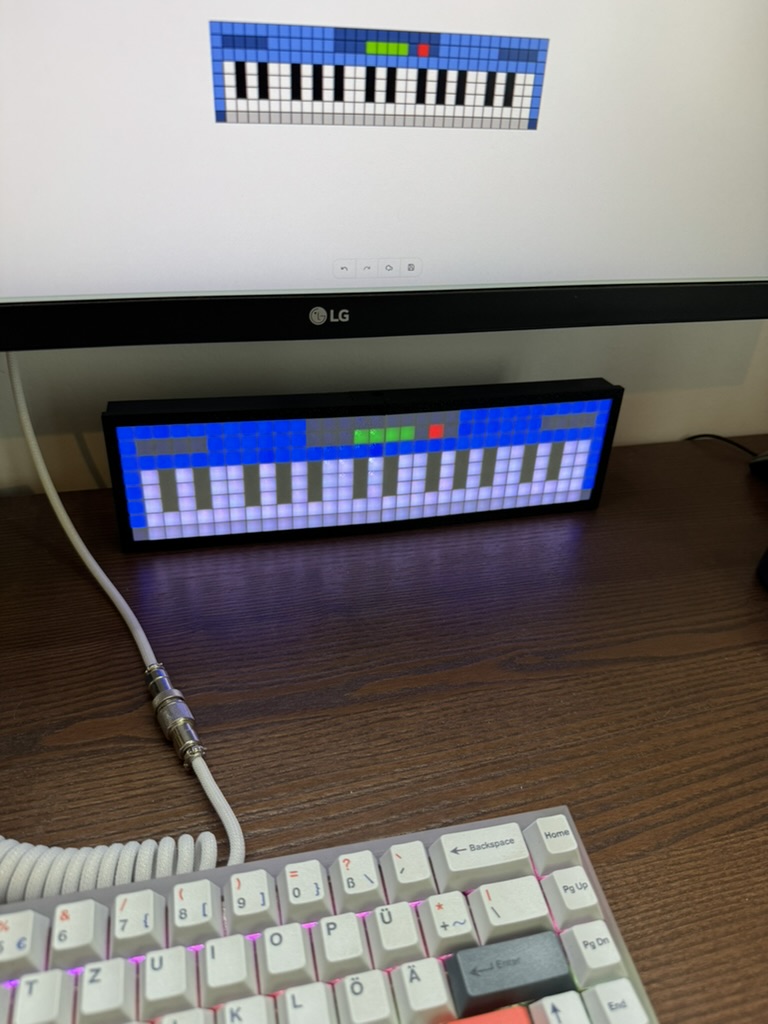
I kept adding small improvements here and there until I suddenly realized this little tool had turned into a mini Photoshop. I even added multi-layer support, which lets you split the drawing into background, shapes, and little details so you can adjust parts freely without breaking everything else.
One detail I am quite happy with lives completely outside of the editor itself. When you share the link to the drawing app, the Open Graph image shows the current LED matrix image itself. Open Graph images are the preview pictures that show up when you paste a link into places like Twitter, Discord, or Slack. In this case those previews aren’t static assets. They are rendered on the server using the same code that draws the display on the website:

The Sync Agent
Up to this point, everything runs smoothly in the browser and Convex. But I still needed a way to push updates to the real physical display. I had two requirements for that part. Updates should feel instant without hammering the server with polling, and I didn’t want to expose any public endpoint to the internet. The solution was a small program that lives on the same network as the display, monitors for new drawings, and sends them over.
This felt like a good opportunity to learn Effect. It’s a TypeScript library for building strongly-typed, composable async workflows, with a very opinionated and powerful model for error handling and recovery. It makes complex code more testable and easier to reason about, but the flip side is that it’s hard to learn and often feels like picking up a new language on top of TypeScript.
The agent itself is a small Node program that keeps a live connection to Convex, watches for new drawings, and pushes the new frame to the display using the WLED JSON HTTP API. It makes 4 sequential requests to update multiple parts one after the other because otherwise the payload would be too big for the ESP32 to handle in memory. The whole thing runs in a container on my homelab, a Raspberry Pi that also runs Home Assistant. I love how this little setup is so straightforward.
It would be nice to run this agent right on the ESP32 for a fully self-contained setup, but I haven’t figured out how yet. Since Node doesn’t run on the ESP32 and I’m quite attached to using Node for this, the Raspberry Pi is my current compromise.
Try It Out
If you've made it this far through the article, you should definitely try it out. Head over to led.stefan.wtf and draw something. Don't be shy, not everyone is an artist. Just have fun with it and draw anything you like. I'm happy every time a new image pops up next to my desk.
The source code is available at GitHub. If you have any questions or feedback, feel free to reach out to me on Bluesky.
updated in January 2026
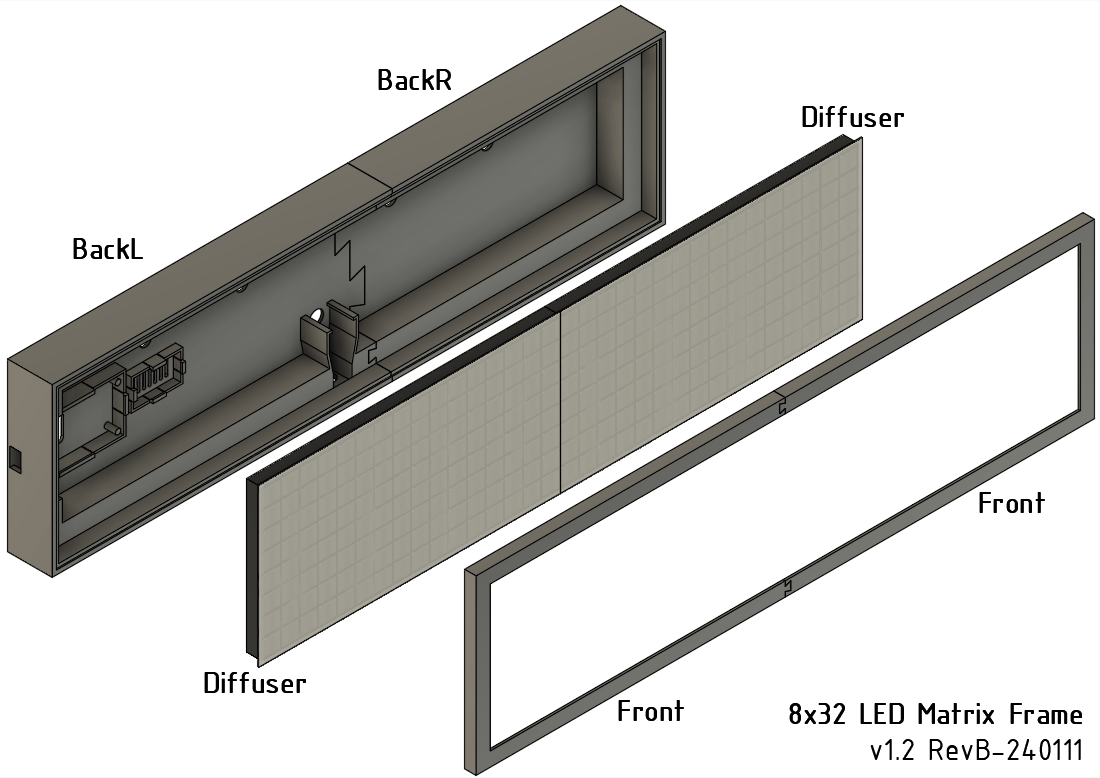
I wasn’t a big fan of the original design, since the diffusion plate was split into four parts and you could still see the seams once everything is assembled. To fix this, I redesigned the housing to support a single piece of frosted acrylic, which looks much cleaner and diffuses the light more evenly.
I also tweaked the front cover so it doesn’t need any glue anymore and adjusted the dimensions for the ESP-32 and power connector. You can find the full model and details on MakerWorld.
written on 12/2/2025 in hardware, programming